This lesson should be preceded by:
Preliminary Lesson 1
Preliminary Lesson 2a
Preliminary Lesson 2b
I usually introduce the idea of an interval during the second or third lesson This is done as part of a lesson and not as an entire lesson time.
After introducing the concept of an interval during the second or third lesson, Mrs. Curwen goes on to recommend that:
“the practice in intervals may be included in the technical work. It is not necessary to give much time to this. One interval asked for at every lesson – played without looking at the hand, and with its various fingerings – is enough; and one interval played to be recognized by ear. Half a minute does it all.” (page 53, 31st edition.)

Aim of the Lesson: To teach the meaning of an “Interval,” and to give first ideas of fingering and keyboard measurement.
Preparation:
Does the student have any familiarity with the word interval or the concept of it as it relates to music? As you discuss with the child his ideas of an interval, be sure to illustrate what an interval is before trying to define it with technical terms.
Method:
An interval is any two sounds struck together or one after the other. Demonstrate this to the student.
Here are two examples of an interval. Play a D and an F together.

Play a C and then a G.

Let’s learn two of the simple intervals now since we’ll soon want to use them. We must be ready when it’s time to read music!
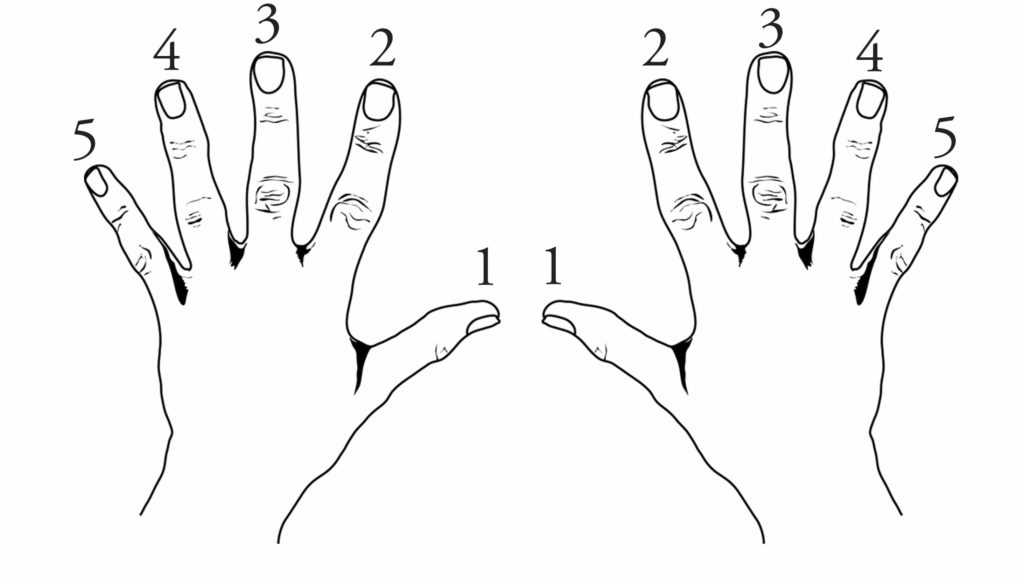
When I refer to fingerings below, I am talking about which fingers to use to play which keys. Below illustrates which numbers represent which fingers.
These can simply be illustrated to a child as the numbers become necessary in discussion about the intervals below.

a.) An Interval of a Second
Place two fingers over any two keys that are next to each other.
Play the two sounds together. Is it a pretty sound?
“Next door” sounds make the interval of a second.
How many different ways can we use our fingers to play an interval of a second? Since the keys are next to each other, we only play seconds with fingers that are next to each other.
Four different ways:
- Fingers 1 and 2 (thumb and pointer)
- Fingers 2 and 3 (pointer and middle,
- Fingers 3 and 4 (middle and ring)
- Fingers 4 and 5 (ring and pinky)
Find me some seconds and play all the fingers we could use to play a second. Here are some examples:


b.) An Interval of a Third
Place three fingers over three keys right next to each other. Play the two outside sounds. In other words, play one key, skip the next, and play the next one.
This is the interval of a third.
Which sounds prettier? A 2nd or a 3rd?
How many different ways can we use our fingers to play a third? Since we skip a key when we play a third, we always skip a finger when playing thirds.
We can use:
- Fingers 1 and 3 (thumb and middle finger together)
- Finger 2 and 4 (our pointer and ring finger together)
- Fingers 3 and 5 (our middle and pinky finger together)
Below are some examples of thirds.


Prepare for the next lesson here: Lesson 3.
