Lessons, 4a, 4b, 4c, and 4d focuses primarily on learning the lines of the staff. Lesson 4e and 4f focuses primarily on learning time and symbols of time.
I recommend moving back and forth a bit between 4a, 4b, 4c, and 4d with 4e and 4f. Cover a few lines and the first symbol of time in one lesson. In the next lesson, cover the next set of lines and the next time symbol.
I mentioned previously that it appears as though Preliminary Lesson 4 continued getting longer and longer as Mrs. Curwen’s teacher’s guide evolved over the years.
She uses some asterisks in lesson four implying recommendations for breaking up the lesson instead of trying to cover it all in one allotted lesson time.
The following lesson is preceded by:
Preliminary Lesson 1
Preliminary Lesson 2a
Preliminary Lesson 2b
Intervals
Preliminary Lesson 3
Preliminary Lesson 4a
Preliminary Lesson 4b
Preliminary Lesson 4c
Preliminary Lesson 4d

Aim of the Lesson:
To teach the following signs:

To also teach a bar line, or strong accent mark.
Preparation:
We have already learned how sounds are pictured or represented on the staff. Every line of the staff pictures a different sound or different pitch.
If all the sounds were played together, we wouldn’t have a song. If all the sounds were heard at the same time, it wouldn’t be a song either. (This can be demonstrated by placing both hands over as many keys as possible and pushing them all down together.)
When we sing or play simple songs, the sounds follow each other. They come one after the other.
Here’s a simple tune:
How are we to show which sounds come first? Let the student suggest.
Maybe something like this:

(Image scanned from Mrs. Curwen’s book, page 64.)
But if we listen again to the music, we’ll hear that some of the sounds are longer than the others. Let’s listen once again.
How do we note sounds of different length as well as different pitch? When we can do both of these, then we can learn to play songs. Today, we’ll begin to learn how to write how long each sound should last. (We also call this timein music.)
Method
a.) One Pulse Notes
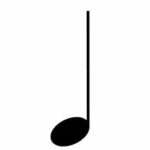
We’ve already learned that we sing taa, taa, taa, taa to represent a one pulse note. Here is a picture of a one pulse note:

Have the student draw a dozen or so one pulse notes with their time names under neath.
It can look something like the following: How is music divided into measures in our ears?
Remember the accented pulse? (See Preliminary Course: Lesson 2b – Time.) We talked about the fence posts in music called bar lines. We mark the strong accent by drawing an upright line, called a bar line.

(The above would be representative of the STRONG, weak, STRONG, weak, STRONG, weak pattern.)
What do we call the space of time between hearing one strong accent and the next? We call it a measure and it’s represented by the distance from one bar line to the next.
In the above picture, we’d call those two pulse measures.
Allow the student to draw some one pulse notes and bar lines. Then label them with the taa’s. Let their illustration be played on the piano using one sound repetitively. Be sure to accent the strong pulse. Maybe something like the following:

b.) Two Pulse Notes
What is the time name of a sound lasting two pulses?
We have learned to sing taa aa.
There are two ways of writing a two pulse sound. Here’s the first way:
 We draw two one pulse notes and connect them with a curved line called a tie. When two notes are tied together in this way, the second sound is not played, but we make the sound sing on through both pulses. We hold the note out.
Now is a good time to sing the two pulse note and let the child imitate the teacher. Also allow the student to write a line of one pulse notes. Add the bar lines to create two pulse measures. Tie some of the notes in varying measures. Sing using taa’s.
The student’s line could look something like the following:
 Go ahead and play the child’s exercise.
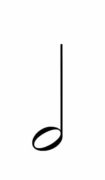
A two pulse note, though, is not generally written with one pulse notes and a tie. We have a special sign for a two pulse note. It looks like this:
 Have the child practice drawing some two pulse notes. Then rub out the original tied one pulse notes he created in his exercise and replace them with a two pulse note.
Taa and play the newly written exercise.
Dictation
Mark off several empty two pulse measures on a paper or small whiteboard. Dictate three or four measures of rhythm to the student.
Since this is the first written exercise of dictation, the teacher can move slowly with the student.
Teacher sings: taa taa.
Pupil fills in the first measure with two one pulse notes.
Teacher sings: Taa aa
Pupil fills in the second measure with a two pulse note.
Keep going for three or four measures.
Finish this introduction to two pulse notes with a final dictation exercise.
Listen to the following tune and dictate the rhythm one or two measures at a time: (This is song #2 from Farm Scenes.)
In Mrs. Curwen’s method a true dictation exercise must be an ear-exercise as well. The teacher plays a simple melody while the student dictates the rhythm. This would be done playing one or two or maybe three measures at a time depending on the child.
c.) Three pulse notes
Ask the pupil how he thinks he could write a three pulse sound. He may suggest this:
 Something notated like the above will work as we introduce the simplest form of taa taa taa becoming taa aa aa.
Ask the child if they can think of any other way to write a three pulse note. Lead the child to remember the lesson we just had on two pulse notes. Maybe the student can put together this:

We see three pulse sounds often written like this. There is also one more way.
The last way to write a three pulse note is to take a two pulse note, and instead of the tied one-pulse note, we simply put a dot in its place. It looks like this:
 Have the student practice drawing a three pulse note.
Let’s draw another set of bar lines and make some three pulse measures. How may different ways can we make a three pulse measure? Let’s see if we can come up with all the different ways.

You and the child may have concluded something like the image right above. Once you have finished, taa through your measures a couple times in a row. Be sure the accented pulse is felt well.
Give a dictation exercise as you did with the two pulse notes.
You can use the following short tune and dictate the rhythm one or two measures at a time. (This is song #10 from Farm Scenes.)
If the child hasn’t developed an ear for writing the rhythms, continue taa-ing one or two measures at a time allowing the student to write one measure at time. Sing and then write. Sing and then write.
Here’s an example that a teacher can taa for the child. Try to do two measures at a time:

d.) Four pulse notes
Let a student write a line of one pulse notes with a line of two pulse notes underneath. Add bar lines every two pulses in both lines. It should look something like this:

Go ahead and play through both lines.
We’re going to create some simple four pulse measures now. By rubbing out a bar line in between every other measure, we can change the above measures into four pulse measures.
Let’s play through them as four pulse measures.
What is the time name for a sound lasting four pulses?
Taa aa aa aa
How do you think we can write a four pulse sound?
The child can work their way through tying one pulse notes together, tying two pulse notes together, three pulse and so on.
Then introduce the sign for a four pulse note:
 Let’s practice drawing some four pulse notes.
With a bit of help from the teacher, allow the student to discover for himself all the different ways he can write a four pulse measure.
There are eight different ways at this point in his learning:

Go ahead and taa through each of these measures above or use the child’s measures.
Finish your study on four pulse notes by dictating the follow tune from Farm Scenes. This would, once again, be done measure by measure. (If you are able to play, this is #1 in the book.)
Summary
1. A sound lasting one pulse is written:
A sound lasting two pulses is written:
A sound lasting three pulses is written:
A sound lasting four pulses is written:

2. The strong accent is marked by a line across the staff, called a bar line.
3. A dot takes the value of the note it replaces.
Homework:
Practice drawing the notes. Write three pulse measures and four pulse measures with different groupings of notes.
In all these lessons, note the order of presentation – 1. the thing; 2. its name; 3. its symbol.
Prepare for the next lesson here: Lesson 5a.
